Experienced Zoomers undoubtedly know the function of break-out rooms in Zoom. Thanks in part to Corona, more and more schools and other organizations are using Zoom as the communication and meeting tool of choice. After doing some research of their own, or following a customized training at 4Webcom (see below in this blog) most Zoomies (Nick name for Zoom users) have activated the break-out room. This is logical, because it allows you to split up groups into several subgroups. But it can do much more. In this article we will focus on the Break-out room (BOR).
Activating your BOR
Before you see the Break-out room (BOR) icon in your Zoom taskbar you first need to activate the feature in your meeting settings. You do this in your profile webpage. On the left side you'll see the menu that starts with profile, a little down you'll see settings and through these settings you'll see a list of options on the right side that you can turn on and off. Fortunately, Zoom has created a small intermediate menu that allows you to jump straight to the "In meeting advanced" setting. And there you have it, the BOR can be activated (set to blue) Also check the function that allows the host or organizer to assign participants.
BOR goes to schedule
For organizations with multiple accounts, I recommend also activating the BOR in the account settings.

If you start up your Zoom meeting after activating the BOR in the settings you will see the typical icon with the 4 blocks of the BOR at the bottom of your taskbar (know that you can also lock this bar via settings so that the taskbar is always in view).
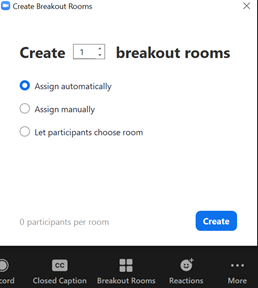
Click on the icon and you will see the 3 layout options plus the counter.
With the counter you can quickly specify the number of BOR you want. Up to 50 Rooms with up to 200 visitors each. Practice makes perfect, so I recommend practicing with a small group first before applying the function in an official meeting.

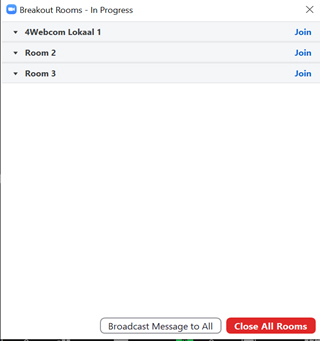
By default you have 3 options for dividing the large group into subgroups.... From top to bottom you can choose 1) Zoom automatically divides the large group into random BOR groups or 2) manually assign people that are logged in to the BOR or 3) the participants can choose in which BOR they want to participate (see screen). When you have made your choice, both for the number of BOR and for the classification, click on the blue create button. The rooms are now visible (see screen)
Move your mouse over the bar of the standard description Room 1 and you will see that you can rename the room or even delete it. If you click on the options button (see above) a special submenu opens in which you can set various things. For example, the participants can choose their own room and in our example a counter that indicates the seconds in which the BOR closes when the host has clicked on close all rooms.

Do you have everything set up as desired? Then click on the blue button of open all BOR (open all rooms), see above and immediately the join button appears next to each BOR. In other words, which BOR do you want to join or just take a look at?
Know that the host and also all co-hosts (unlimited to create) can also control the join button. For example teachers who want to visit different subgroups.
Finally, you can also send all BOR a message that can be read by all participants. In this way, large groups can be divided into small groups creating a kind of mini zoom meetings. When you click on close all BOR (red button: close all rooms) then all participants come together again in one large room. Handy right?
Pre-classification and naming of Break-Out Rooms: live custom online training
The above description is just the beginning, because there is much more you can do with Zoom BOR. Think of the allocation of the Break-Out Rooms in advance and even preparing the names of the rooms in advance so that the future participants are immediately directed to the right rooms or, if desired, can choose which room they want to participate in (notification on the participant's device in the form of a join break out room).
We deal with such a layout during our live custom online training. We show how to create a personal room as host (that is a kind of fixed room, fixed classroom). Through a personal meeting ID. In addition, we teach you how to create a number of BOR in the personal Room and also how to name them already (give them a name). You then save your own Room and with just one click on the orange button in your ZOOM Client (start a measurement) you are ready for the meeting including all the BOR. No last minute stress. And very safe in combination with the waiting room.
Useful for all organizations and/or schools for various activities such as town hall meetings, open days, live online events and more. In short, activities where participants first enter a large meeting and then see a selection button on their device asking them to which BOR they want to go (join BOR announcement)
If you want to discover these BOR possibilities and apply them yourself, or discuss other options in Zoom, then as a (future) client of 4Webcom you are welcome to attend our special live online group training sessions (small fee). Feel free to email support@4webcom.com and we would love to see you online.